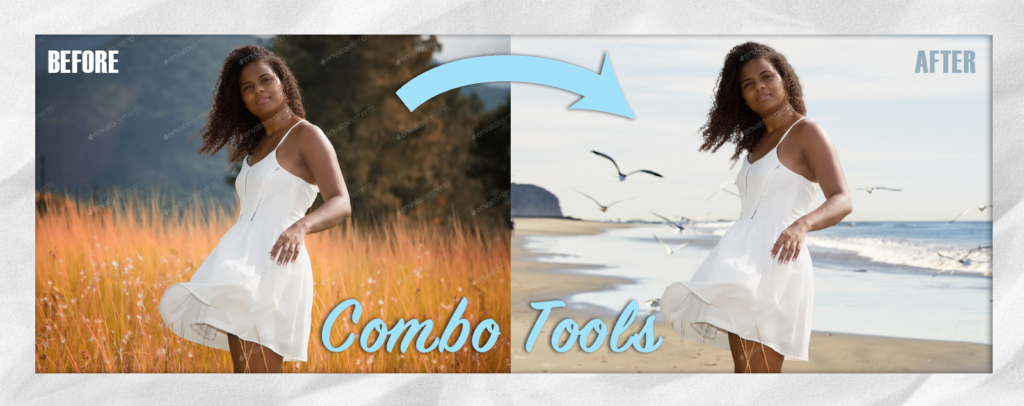
Every photograph is different, so we need to learn multiple methods to eliminate backgrounds fast in Photoshop. This is Part 4 of a four-part series.
How Combo Tools Work:
Combo Tools allow you to use multiple methods to eliminate backgrounds from images where no single method can achieve a satisfactory result.
When to Use Combo Tools:
Use Combo Tools whenever you need to eliminate backgrounds from people or objects that have both smooth and fuzzy edges.
What You’ll Need:
To complete this tutorial on eliminating backgrounds in Photoshop, download this resource image: Model-in-Meadow
Directions:
Here are step-by-step instructions for eliminate backgrounds using Combo Tools.
Step 1
Download and open the resource file in Photoshop. Now save it as a PSD file. Our objective is to make two masks: one that is fuzzy for the model’s hair and one that is smooth for her body and clothes.
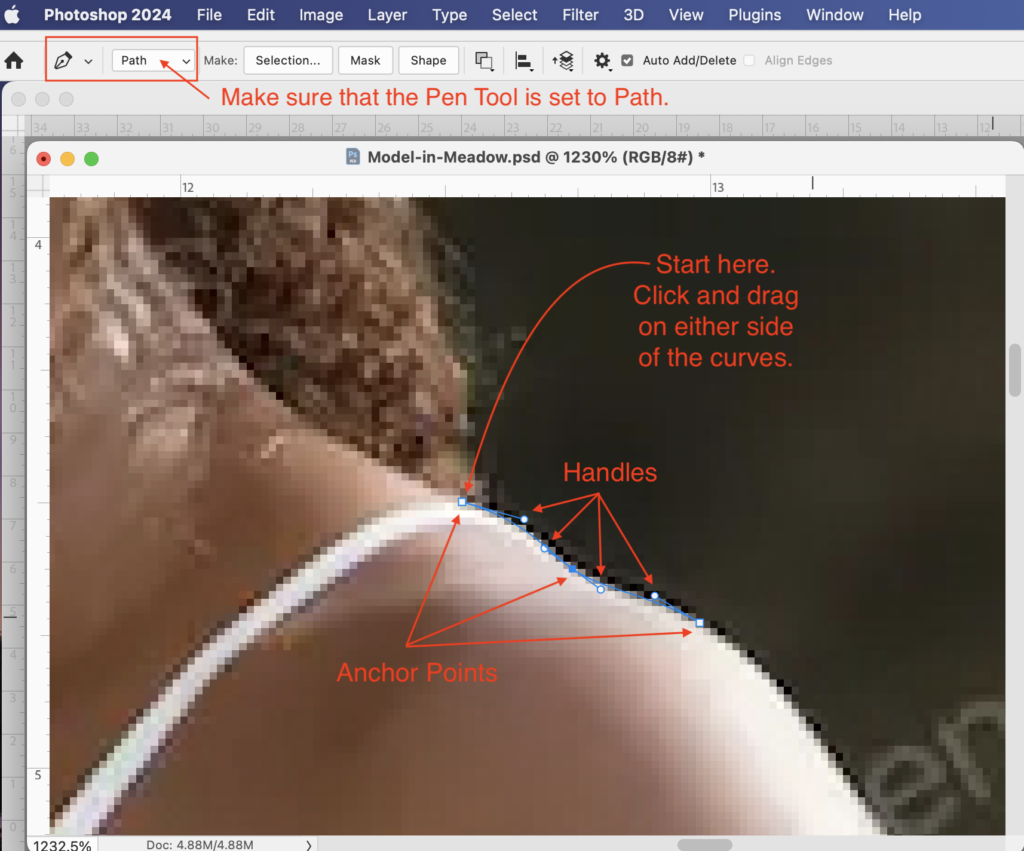
Let’s start with the smooth mask first because it is easier. Select the Pen Tool by typing a P, make sure that it is set to Path, and start drawing a line close the the model’s arms, legs and clothes. Start at the model’s right shoulder with the white strap.
How to Use the Pen Tool
If you are familiar with the Pen Tool, skip ahead to “Finish Your Pen Path”.
First, zoom in on the model’s right shoulder with the white strap, click on the point where the hair meets the strap, and drag the Pen over the top of the strap. Then click on the point where the strap meets the shoulder and drag again. You want to put the Anchor Points at the beginning and end of each curve. Draw your Pen Path so that it straddles the pixels where the model meets the background. Doing so prevents an ugly outline where the background peaks through.
A click with the Pen Tool creates an Anchor Point. Dragging the Pen creates two Handles, one on either side of the Anchor Point. You can adjust the curvature of your Pen Path by moving the Handles until the path is just right. To select a Handle, type an A. The default gives you the Black Path Selection Tool. Type Shift + A to get the White Direct Selection Tool. The white one is the one that allows you to grab the Anchor Points and their Handles to adjust the curves. I like to make adjustments as I go, but you don’t have to. When you are ready to continue drawing your path, type a P to get the Pen Tool back and simply continue.
Once the Direct Selection Tool is showing in your Tools Panel, you can then grab the Pen Tool and toggle back to the Direct Selection Tool temporarily by holding down the Command Key while you move the Handles or the Anchor Points. Let go of the Command Key and you have the Pen Tool again. This is a great convenience!
Review the Pen Tool Process
So the process is, grab the Pen Tool, click-&-drag, hold down the Command Key to use the Direct Selection Tool to adjust the Handles, then let go of the Command Key and click-&-drag again. Click without dragging to make straight lines where needed. Sometimes, you need to pull one Handle in close and the other out really far. Sometimes, you need to move the Anchor Point entirely before the curvature of your path is just right. I usually put down 5 or 6 Anchor Points, then hold down the Command Key to fix the Handles and Anchor Points before scrolling to another place in my photo to continue drawing my path.
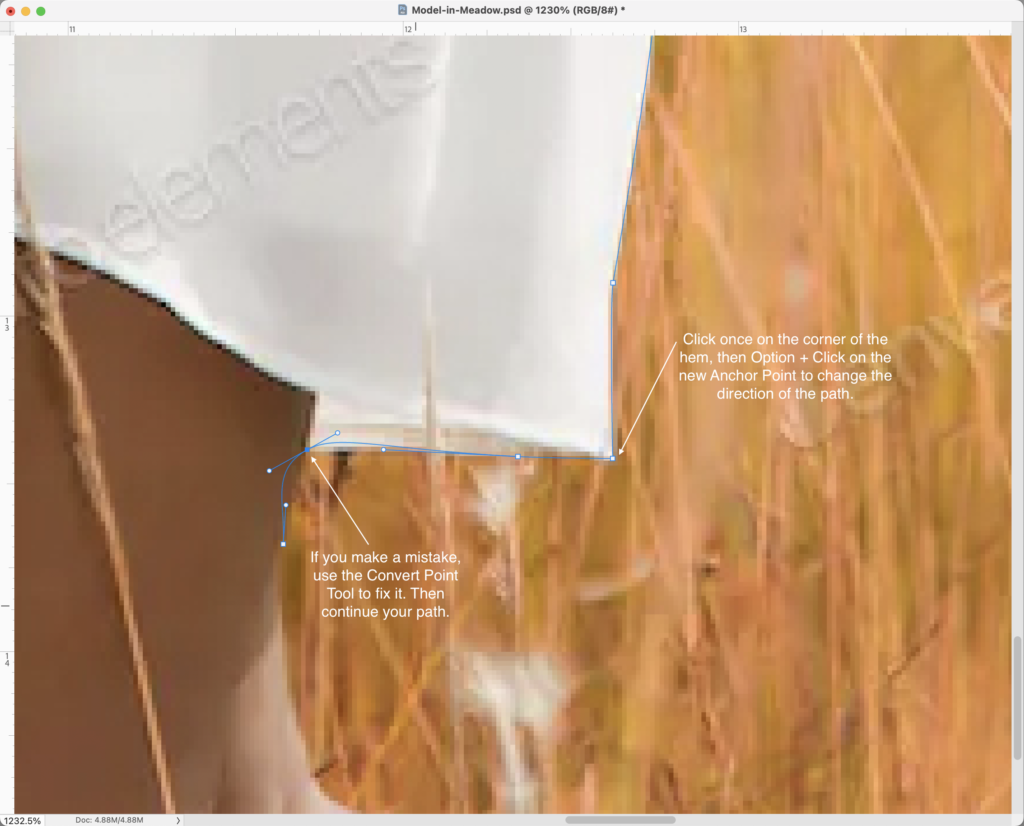
Once you get down to the hem of the skirt, click once to put an Anchor Point on the corner of the hem, then Option + Click on your new Anchor Point to make a sharp change of direction in your Path. Click and drag along the hem, then Click, Option + Click again when you get to the model’s leg. If you make a mistake and put an Anchor Point with Handles, simply hold down the Option Key, hover the Pen Tool over the Anchor Point and let the Pen Tool temporarily turn into a Convert Point Tool. Click once on the Anchor Point to change it. Continue until you get the the model’s left shoulder.
Finish Your Pen Tool Path
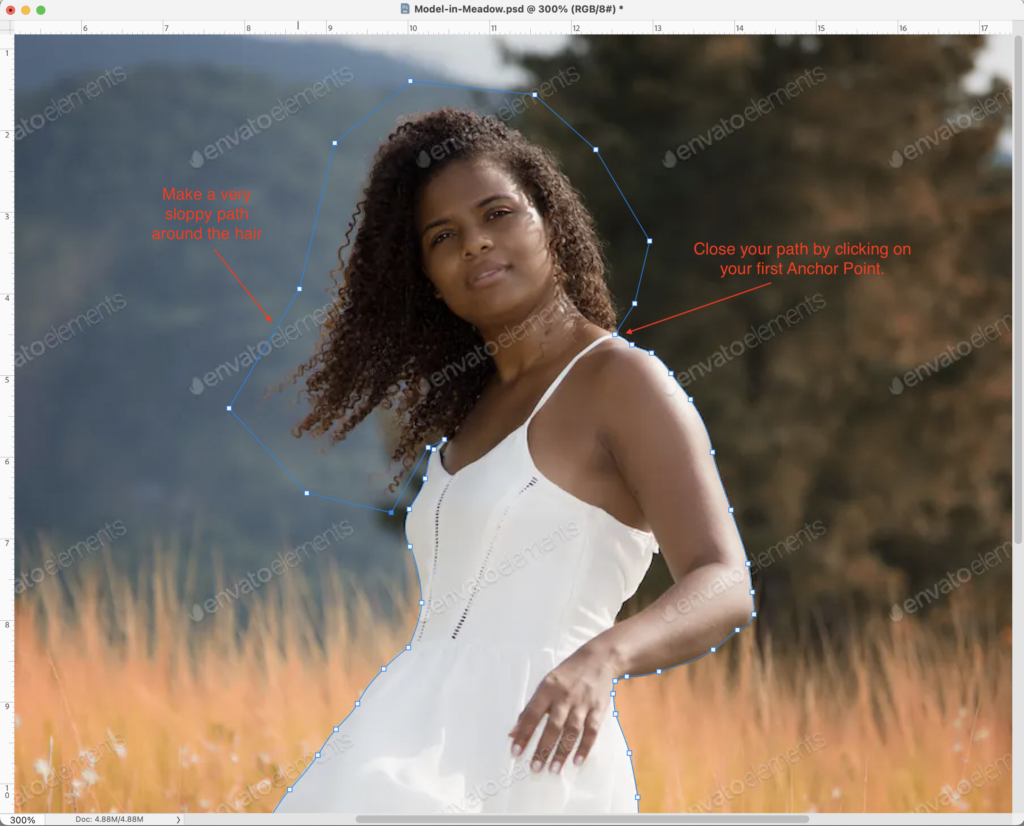
Once you have made a Pen Tool path down the right side of the model’s body and back up to the left shoulder, click away from the model’s body and make a very sloppy path around the model’s hair. To close the path, click on the first anchor point you made on the model’s right shoulder.
Step 2
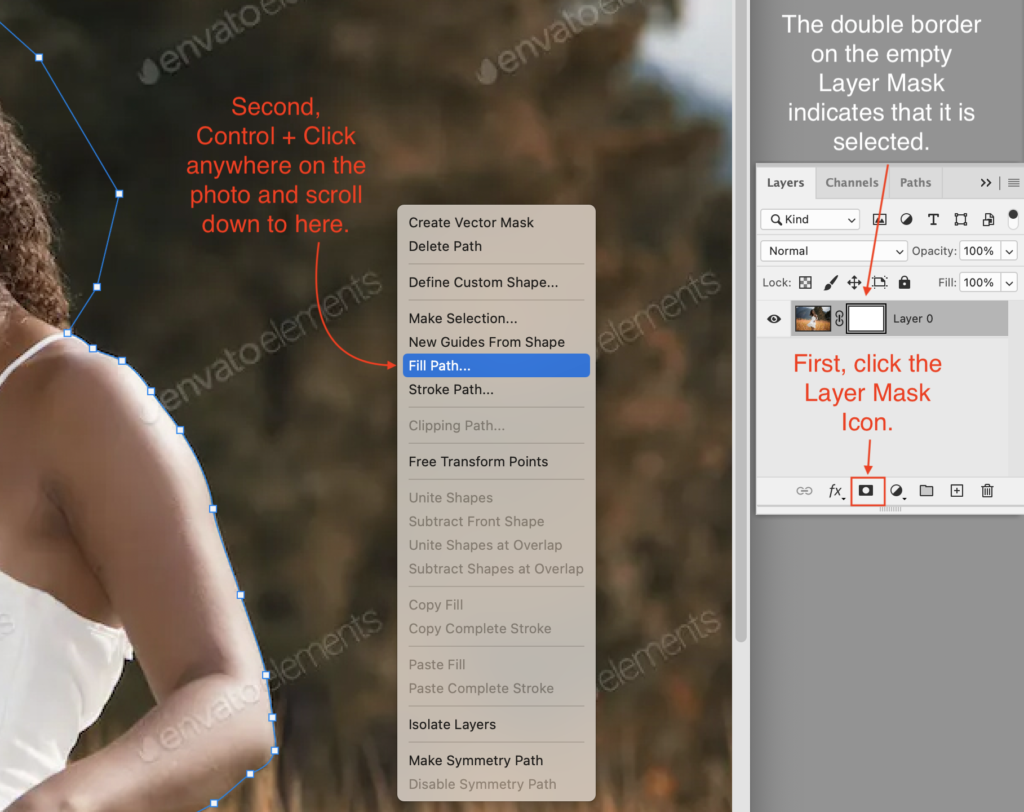
With the Direct Selection Tool active, click the Layer Mask Icon. Your locked Background will automatically be converted into Layer 0 with an empty Layer Mask. Click on the Layer Mask, then Control + Click anywhere on the photo to reveal a pop-up menu. Scroll down to Fill Path.
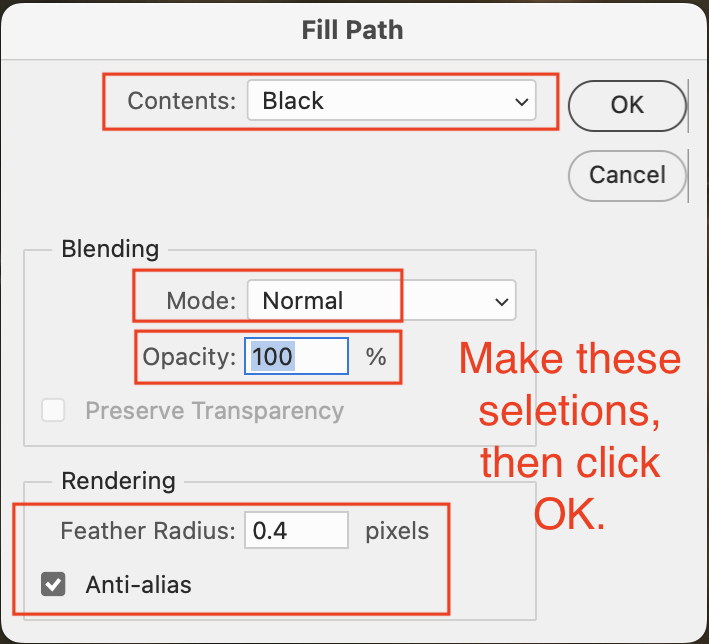
The Fill Path dialog box will appear. Select Contents: Black; Mode: Normal; Opacity: 100%; Feather: 0.4 pixels. Click OK.
Step 3
Your Pen Path has now become the Layer Mask. If you like, you can Double Click on the Layer Mask to open the Properties Panel. There, you can add additional feathering on the mask. I don’t believe that additional feathering is needed for this image.
I recommend that you take this opportunity to examine your mask around the model’s body to verify that you are happy with the results. If you want to make changes, use the Direct Selection Tool (⇧A) to move the Anchor Points and/or Handles.
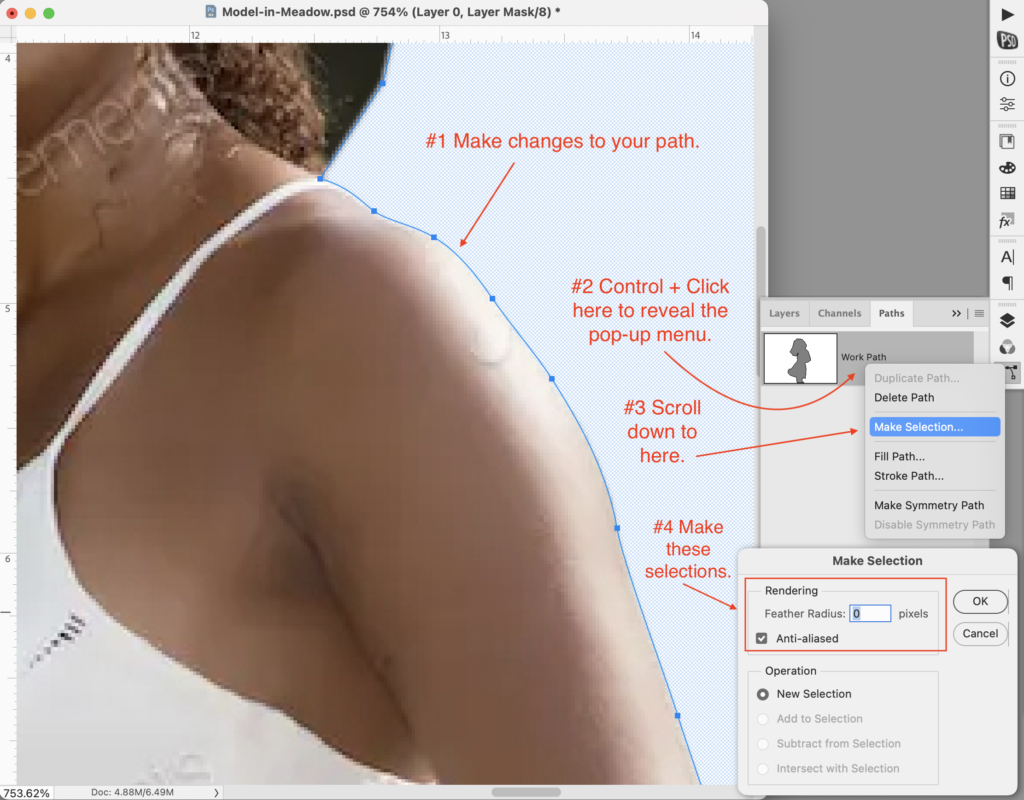
While the Path is selected, Control + Click on the Work Path in the Path Tab to reveal a pop-up menu. Scroll down to Make Selection. When the Make Selection dialog box appears, leave the Feather Radius at zero pixels and put a checkmark on Anti-aliased. Click OK.
Next, go to the Layer Mask and click on it. Use the Brush Tool (B) to paint black on the mask to eliminate the background next to the model. The selection will prevent you from painting the mask over the model. If the problem is that the model’s body or clothes got covered by the mask, invert the selection (⌘⇧I), then use the Erase Tool (E) to reveal more. The selection will prevent you from painting the mask over the background. Once you are satisfied with your work, type ⌘D to deselect and proceed to Step 4.
Step 4
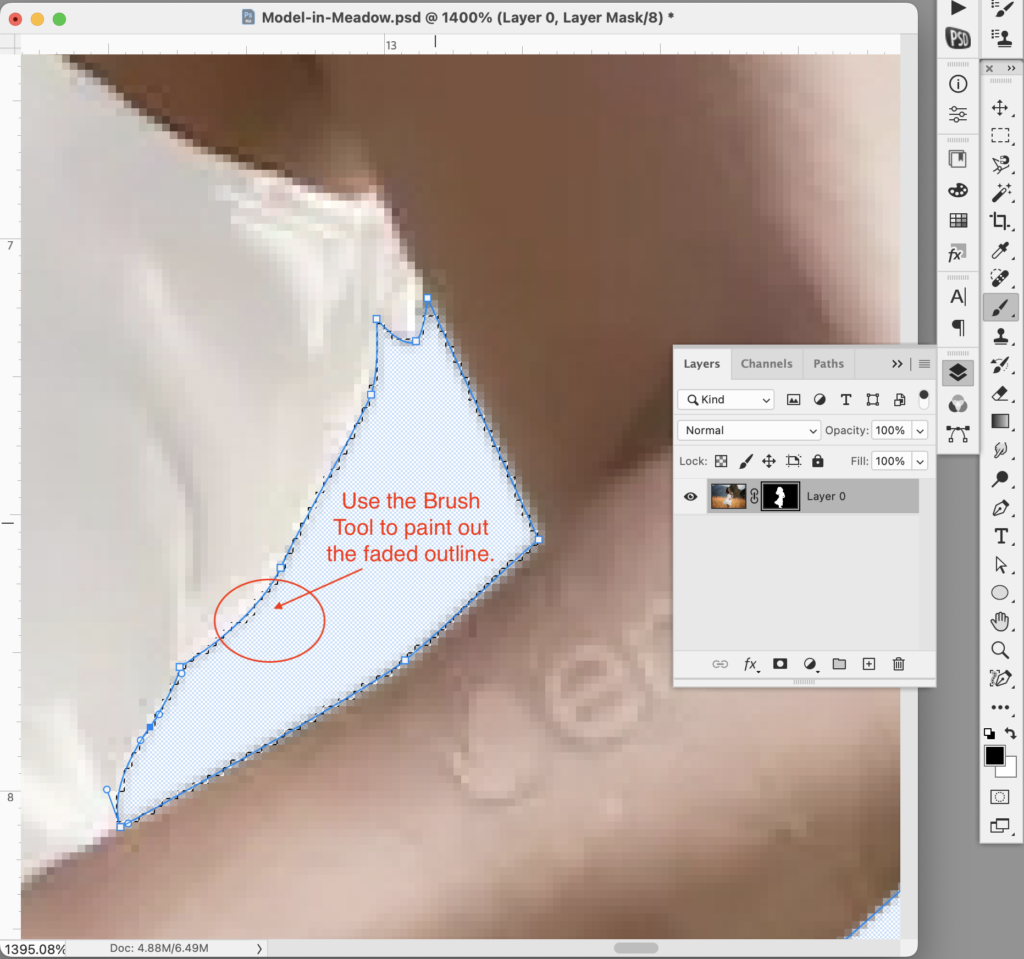
Draw a Pen Path around the triangle of background peaking out in the crook of the model’s elbow. Hold down the Command Key to toggle to the Direct Selection Tool and make adjustments as needed. While the Path is selected, Control + Click on the Work Path in the Path Tab to reveal a pop-up menu. Scroll down to Make Selection. When the Make Selection dialog box appears, choose a Feather Radius of 0.4 pixel and put a checkmark on Anti-aliased. Click OK. Zoom out to verify that only the triangle is selected. If you see marching ants around the entire perimeter of your image, invert the selection (⌘⇧I) before continuing.
Next, go to the Layer Mask and click on it. Fill the selection with black by hitting the Shift + F5 keys. In the Fill dialog box, select Black as the Fill Color. By default, Photoshop will present Black as the foreground color when the Layer Mask is selected, but verify it before clicking OK. Now, the triangle of background is hidden by the Layer Mask. If there is a faded outline, use the Brush Tool (B) inside the selection to paint black on the Layer Mask. Type ⌘D to deselect. Now, your smooth-edged mask around the model’s body is done.
Step 5
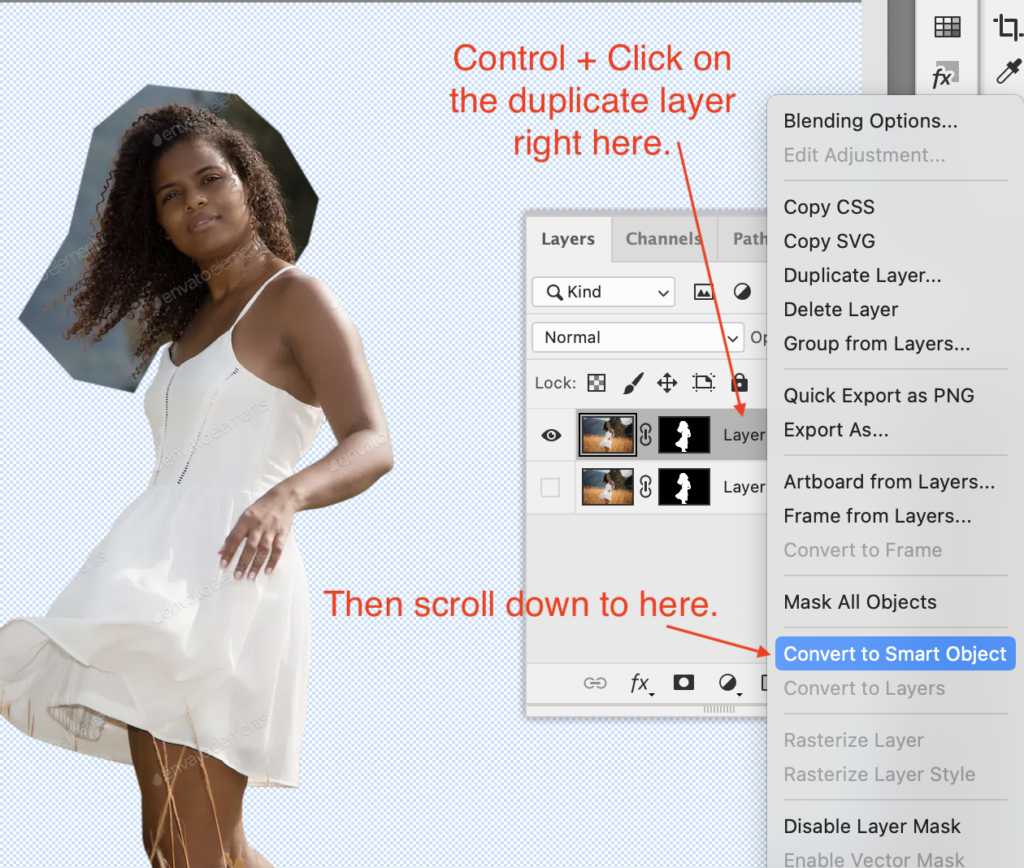
Now, we will make a fuzzy Layer Mask for the hair. Go back to the Layer Panel Tab and duplicate your layer (Layer Menu + Scroll down to Duplicate Layer). Always duplicate your original layer and work on a copy in case you need to go back to unaltered pixels later. Hide the original layer by clicking on the eye icon. Control + Click on the duplicate layer to reveal a pop-up menu and scroll down to Covert to Smart Object. A little symbol will appear on the thumbnail on the layer.
Step 6
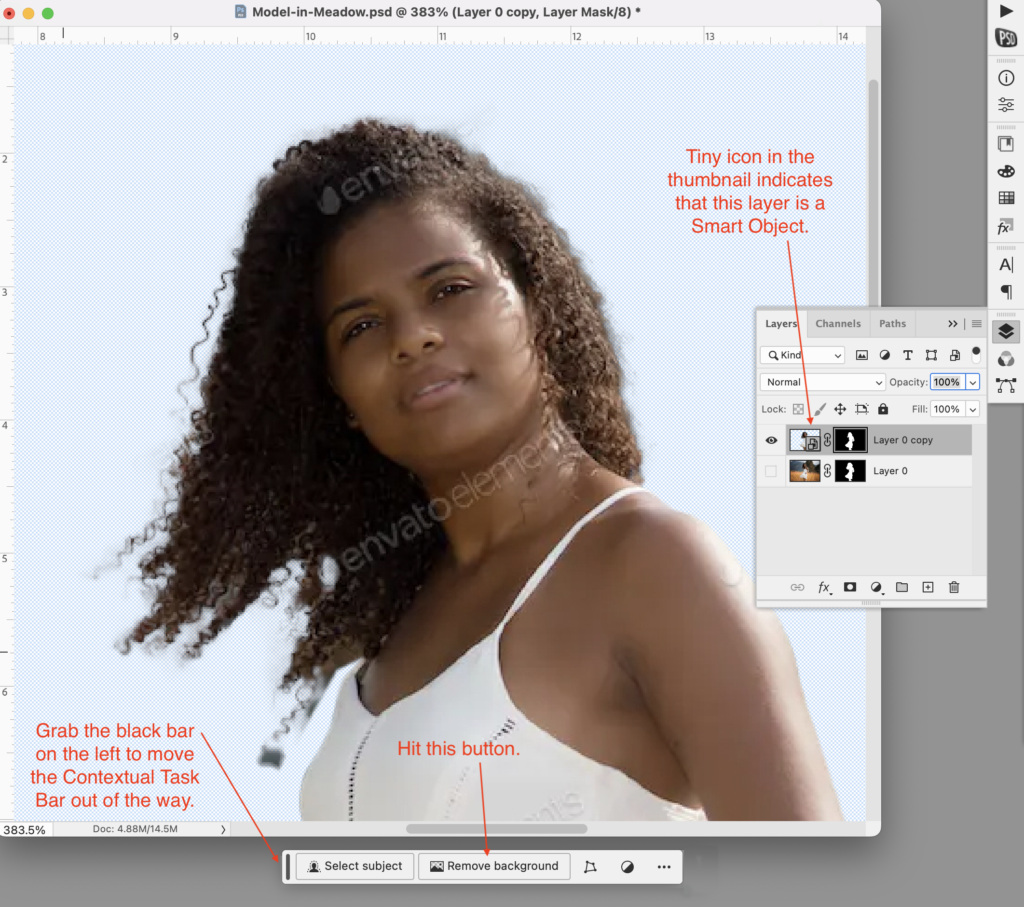
Go to the Window Menu and scroll down to Contextual Task Bar. The Contextual Task Bar will appear at the bottom of your image, but you can move it out of the way. Hit the Remove Background button, which will automatically add a mask to your Smart Object Layer.
Step 7
The result is almost correct. Some of the background is still showing through the wispy tendrils of hair. Go to the Select Menu and scroll down to Select & Mask (or hit ⌥⌘R). The Select & Mask Properties Panel appears. Make sure to check Smart Radius and set the Radius to 4 px. Next, hit the Refine Hair button in the Options Bar at the top. It will refine the selection around the hair, but not the rest. You also want to make sure that the Refine Edge Brush is active. It will appear automatically on the left-hand side. Click and drag the Refine Edge Brush across the edges of the hair. Last of all, choose Decontaminate Colors, (located near the bottom of the Select & Mask Properties Panel), set the amount to 100 and select Output to New Layer with Mask. Click OK. The Smart Object layer will be hidden.
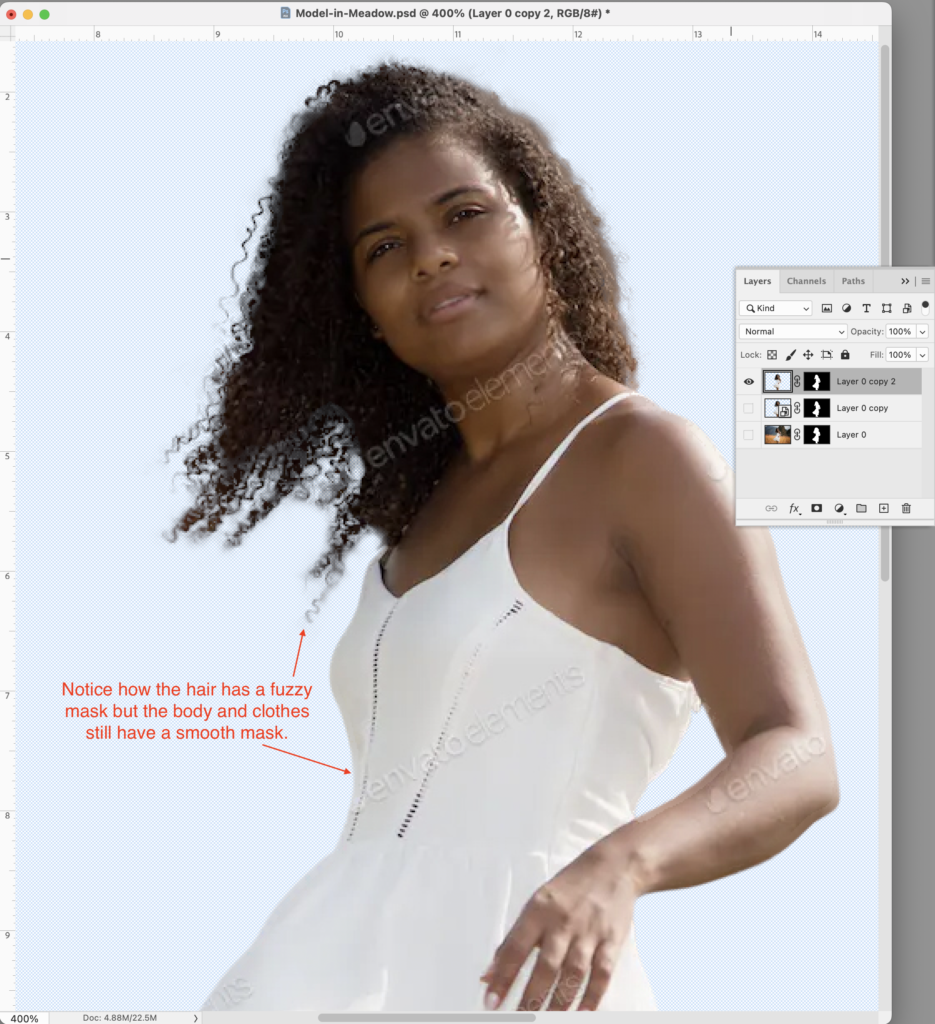
You can further finesse the hair mask by painting on the mask or going back to Select & Mask. When you are satisfied, you are done!
The Final Results
Below is what the final result looks like. You are now ready to substitute the original background for one of your own.
Envato Tuts has posted a video tutorial for all four methods on YouTube for those who learn best that way. Here is the link. Be sure to like and subscribe to their channel!
Jump to the other tutorials on how make backgrounds transparent in Photoshop:
I hope you enjoyed this tutorial. I am a graphic designer who does a lot of Photoshop work for my customers. Please take a look at my other tutorials and resources.
Awesome Photo Mockups In 2 Easy Steps
Creating A Photo Mockup From Scratch
17 Free DIY Resources for Graphic Designers
By Martha Ridgeway, Graphic Designer
